Edgertronic camera software recovery
A bricked camera is when the software on the micro SD card that runs the camera is no longer usable. The micro SD card is the small one that you normally don't remove in the recessed slot between the big SD card and the LEDs. If you lost power during a software update, you may have bricked your camera. If you think your camera is bricked for some other reason, please send an email to info@edgertronic.com with the details of what happened right before the camera stopped functioning correctly.
Getting the latest camera software
Download the microSD card image file:
BalenaEtcher supports zip files so there is no need to unzip the file first.
Removing the micro SD card
The micro SD card is in the slot next to the big SD card. The micro SD card is recessed and in a spring loaded slot. You remove the micro SD card by gently pushing the card farther into the camera (just like you do with the big SD card) and then the micro SD card will pop out. You may find a paperclip is the right size to allow you to press the micro SD card farther into the camera).
Be sure to press the micro SD card straight in (meaning perpendicular to the camera back) otherwise the card may hang up on the edge of the slot.
Reimaging the micro SD card
Setting up our host computer
Before we can actually write to the micro SD card from a Windows or Mac computer you need to download two applications first. The SD Card Association provides a tool that repairs SD cards as part of the formatting process. BalenaEtcher is then used to reimage the entire microSD card with the image from the zip file you downloaded in the previous step.
Repairing and reformatting
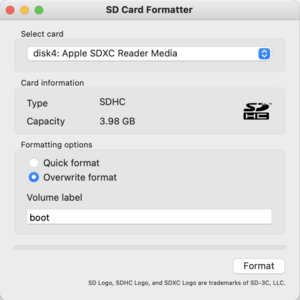
The SD Memory Card Formatter for Windows/Mac from the SD Association is the best tool we have found to fully restore the micro SD card to a usable state.
- Download and install the SD Card Formatter application.
- Install micro SD card into your computer. Press cancel if your computer asked if you want to format the card.
- You may need to purchase the appropriate hardware adaptor to be able to attach the micro SD card to your computer.
- Run the SD Card Formatter application.
- Select the card from the drop-down list.
- Select Overwrite format.
- Use BOOT for the Volume label
- Click on the Format button
- Confirm you want to proceed by clicking on the Continue button
- You may have to enter your computer password to proceed
Leave the micro SD card installed in your computer.
Disk imaging
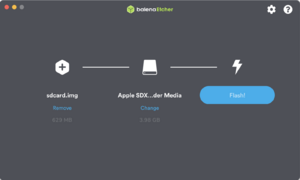
The BalenaEtcher disk imaging tool is the easiest to use tool to transfer the contents of the zipped image file to the micro SD card.
- Download and install the BalenaEtcher application.
- Be sure you have downloaded the zip file from as described above. The zip file size should be a minimum of 150MB. If you downloaded the file more than once, your computer likely modified the filename. Use the file with the unmodified filename.
- Run BalenaEtcher.
- Select Flash from file. Select the zip file you downloaded. It will likely be in the cleverly named Downloads directory on your computer.
- Select Select target. I installed an 4GB micro SD card, so I selected the device with SD in the name and a size 3.98GB. If Balena incorrectly identified the micro SD card as a system drive, click Yes, I'm sure'. If you are uncertain, exit Balena, remove the micro SD card, and run Balena again to see which device is no long in the select target list.
- Wait until Balena reports Flash Complete! before removing the micro SD card. Then I always wait an additional 15 seconds just to give the card time to finish any writes that may be in process.
Reinstalling micro SD card into camera
Once you have an imaged micro SD insert it back into the camera. It is important that you insert the micro-SD card in the correct orientation. The micro SD label faces the system and camera LEDs and the gold contacts face the big SD card. Incorrectly inserting or forcing the micro SD card will cause damage to the camera that is not covered under warranty. Insert the micro SD card with the camera powered off. You can use a paperclip to gently push the micro SD card into the slot. Give the camera about a minute then the LEDs should be back on and the camera should update itself. If the image you used to update the camera was an older version of software you will need to conduct a software update manually after the camera finishes the re-image process.
Simply take the newest software update (or desired software version's update) file and copy it directly onto the SD card(the big one), power on the camera and wait through the LED “white pattern” as the camera updates.
If the camera still does not work, try a factory reset.
Failed update - System LED solid red or blinking yellow
If something went wrong, like the disk imaging was interrupted, the camera will not boot properly. Instead you will see a solid red System LED or perhaps a blinking yellow system LED. In these cases, start by deleting your downloaded zipped image file. Then follow the steps above again, perhaps being a bit more patient between steps to give the micro SD card time to finish its internal activities before moving onto the next step.


